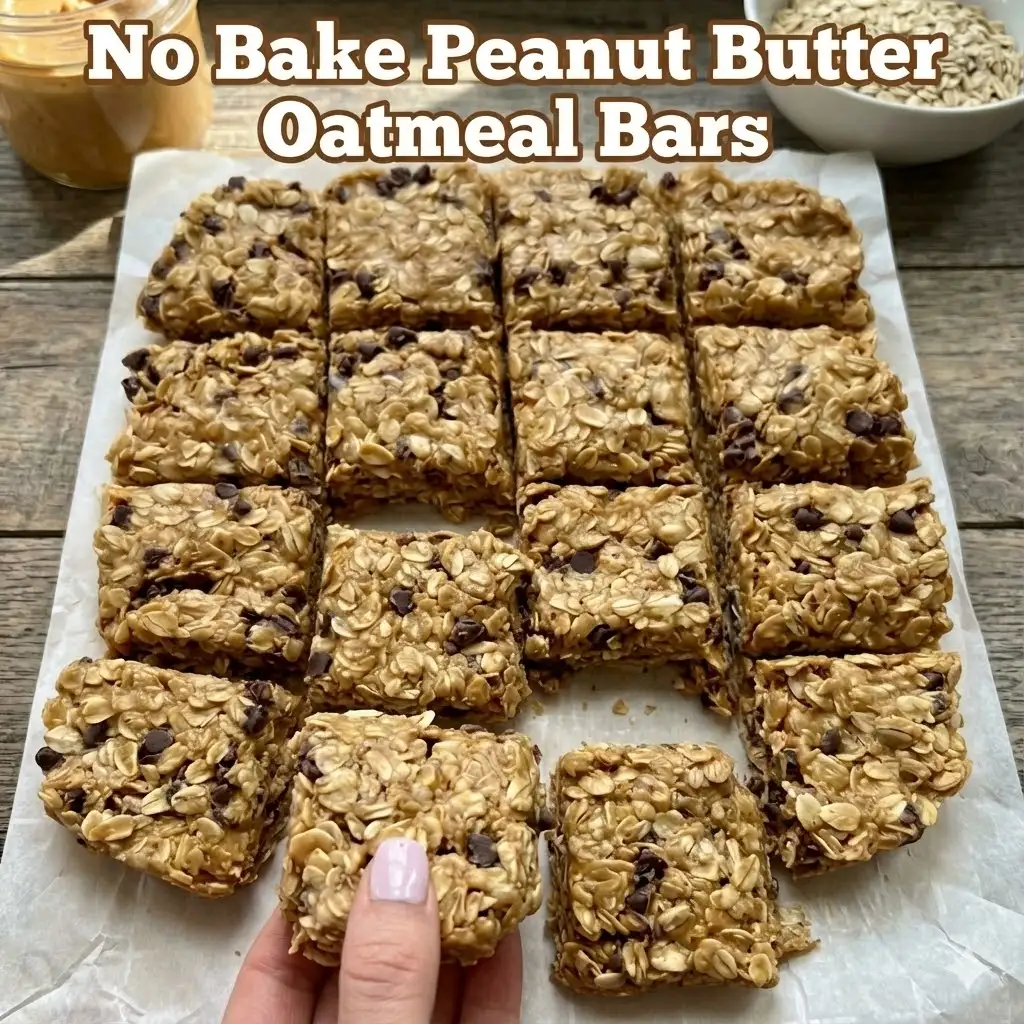
Turn off the oven. We are making the ultimate chewy, sweet, and salty snack right on the countertop.
We have all been there. It’s 3:00 PM, the mid-afternoon energy slump has hit, and you are frantically searching the pantry for something sweet that won’t ruin your whole day of healthy eating. You want a cookie, but you don’t have the time (or the patience) to preheat the oven and wait for a timer.
This is exactly why you need these No Bake Peanut Butter Oatmeal Bars.
Think of them as the healthier, more sophisticated cousin of the granola bar. They are packed with heart healthy fats, complex carbohydrates, and enough chocolate to satisfy that dessert craving without the sugar crash.
Because this is a no bake dessert, the texture is incredible. They are dense, chewy, and soft, almost like eating cookie dough in bar form. Plus, with only four ingredients that you likely already have in your kitchen, this recipe is the definition of “low effort, high reward.”
Why You Will Love This Recipe
- Pantry Staple Hero: You don’t need to run to the grocery store. If you have oats, peanut butter, and a sticky sweetener, you are ready to go.
- Zero Oven Required: Perfect for hot summer days when you can’t bear to heat up the house, or for dorm rooms and kitchens with limited equipment.
- Freezer Friendly: These bars actually taste better straight from the freezer. Make a big batch and you have snacks for the next three months.
- Kid-Approved: They taste like a treat, but they are packed with fiber and protein. It’s the perfect lunchbox addition (if your school allows nuts!).
- Customizable: Consider this a base recipe. You can add protein powder, nuts, dried fruit, or seeds to make it your own.
Ingredients & Smart Swaps
The beauty of this recipe lies in its simplicity. However, because we are using so few ingredients, quality matters. Here is why we use what we use, and how you can swap things out if needed.
The Binding Agents
- Creamy Peanut Butter (1 cup): This provides the healthy fats and protein, but more importantly, it acts as the glue.
- Expert Note: I recommend using a standard creamy peanut butter (like Jif or Skippy) or a “no stir” natural variety. If you use the super runny natural kind where the oil separates on top, your bars might be a bit too oily. If using natural, make sure to mix that oil in thoroughly first!
- Substitution: Can I use almond butter? Absolutely! Cashew butter or sunflower seed butter (for a nut free option) work perfectly.
- Honey or Maple Syrup (1/2 cup): This is the second half of our glue. It adds sweetness and stickiness.
- Substitution: I prefer Honey because it is thicker and helps the bars hold their shape better at room temperature. However, Maple Syrup makes this recipe 100% Vegan. If using maple syrup, keep the bars in the freezer as they will be softer. Agave nectar works as well.
The Structure & Flavor
- Rolled Oats (2 3/4 cups): We need “Old Fashioned” rolled oats here. They provide a chewy texture and hold up well against the heavy peanut butter.
- Substitution: Can I use quick oats? Yes, you can. The texture will be much softer and less “nutty,” but they will still hold together. Do not use steel-cut oats; they will be too hard to chew.
- Dark Chocolate Chips (1/2 cup): The bitterness of dark chocolate cuts through the rich peanut butter perfectly.
- Substitution: Feel free to use semi-sweet chips, milk chocolate chunks, or even cacao nibs for a crunchier, lower-sugar option. For a fun twist, try white chocolate chips or peanut butter chips!
Step by Step Guide: How to Make Perfect Bars
While this is a “dump and mix” recipe, the order in which you mix things affects the final texture. Follow this narrative guide for the best results.
Step 1: Prep the Pan
First, grab an 8×8 or 9×9 inch square baking pan. Kitchen Hack: Line the pan with parchment paper and leave about 2 inches of overhang on two sides. This creates “handles” that let you lift the entire block of bars out of the pan easily once they are frozen. No digging required!
Step 2: The Liquid Gold
In a large mixing bowl, combine your 1 cup of peanut butter and 1/2 cup of honey. Using a spatula or a sturdy wooden spoon, stir them vigorously until they are fully combined. Expert Tip: If your peanut butter is near the bottom of the jar and feels stiff, microwave the peanut butter and honey mixture for 20-30 seconds. Warm liquid mixes much easier with the oats!
Step 3: Add the Oats
Pour in the 2 3/4 cups of rolled oats. Fold them into the peanut butter mixture. You want to ensure every single oat is coated. It takes a little elbow grease—the mixture will be thick and heavy. Keep stirring until no dry oats are visible at the bottom of the bowl.
Step 4: The Chocolate (Temperature Matters!)
If you warmed up your peanut butter in Step 2, let the mixture cool for 5 minutes before adding the chocolate. If the mix is too hot, the chips will melt and turn your bars brown. Once cool to the touch, fold in the 1/2 cup of dark chocolate chips.
Step 5: Press and Compact
Dump the mixture into your lined pan. Using the back of a spatula (or your hands), press the mixture down firmly. Kitchen Hack: Wet your hands slightly with water or spray your spatula with a tiny bit of non stick oil. This prevents the sticky mixture from clinging to you. You need to pack this down very tight the tighter you pack it, the better the bars will hold together when you cut them.
Step 6: The Chill
Place the pan in the freezer for at least 30 to 60 minutes. This sets the peanut butter and honey, solidifying the bars.
Step 7: Slice and Serve
Use the parchment paper handles to lift the block out of the pan. Place it on a cutting board and use a sharp knife to slice into 16 squares or 12 longer bars.
Nutritional Breakdown
Based on cutting the batch into 16 square bars.
- Calories: ~210 kcal
- Carbohydrates: 24g
- Protein: 6g
- Fat: 11g
- Sugar: 12g
These bars are energy-dense, making them perfect for pre-workout fuel or a hiking snack!
Dietary & Storage Information
Dietary Tags:
- Gluten-Free: Oats are naturally gluten-free, but they are often processed in facilities with wheat. To make this safe for Celiacs, you must use certified Gluten-Free Rolled Oats.
- Vegan: Simply swap the honey for pure maple syrup and ensure your chocolate chips are dairy-free.
- Dairy-Free: Naturally dairy-free (check your chocolate labels).
Storage Instructions: Because natural peanut butter and honey can get soft at room temperature, these bars have a specific storage hierarchy:
- The Freezer (Best): Store in an airtight container or Ziploc bag for up to 3 months. They don’t freeze rock-hard, so you can eat them straight away!
- The Fridge: Store in an airtight container for up to 2 weeks. They will stay firm and chewy.
- The Counter: Not recommended, especially in summer. They may become too soft and crumbly.
Frequently Asked Questions
Q: Why are my oatmeal bars crumbling and falling apart? A: This usually happens for two reasons. First, the ratio of dry to wet ingredients might be off (did you pack the oats too tightly in the measuring cup?). Second, you might not have pressed them firmly enough into the pan. You really need to compress them to remove air pockets. If the mix seems too dry before pressing, add an extra tablespoon of honey.
Q: Can I double this recipe? A: Yes! This recipe scales up easily. If you double it, use a 9×13 inch pan instead of an 8×8 square pan. You might need a larger bowl to mix it all, as the oats get heavy!
Q: Can I add protein powder? A: You can, but protein powder acts like flour it absorbs moisture. If you add a scoop of protein powder, you will need to add more liquid (honey or almond milk) to balance it out, otherwise, the bars will be powdery and dry.
Q: Are these healthy for weight loss? A: While these are made with wholesome, unrefined ingredients, they are calorie-dense due to the peanut butter and oats. They are a “healthy dessert” or energy source. If you are tracking calories, stick to one square serving!
Final Thoughts
There is something satisfying about making a batch of snacks on a Sunday and knowing you are covered for the week. These peanut butter oatmeal bars check every box: sweet, satisfying, and incredibly easy to make.
Next time that late night sweet tooth hits, skip the processed cookies and whip these up instead. Your body (and your tastebuds) will thank you.
Did you try this recipe? Leave a comment below and let me know what mix-ins you used! I love seeing your creations.